You hit a bump on your neighborhood ride. Suddenly, your rear wheel wobbles like it’s got a mind of its own. That uneasy shake makes you pull over fast. You’re worried about a crash or a busted tire.
Spokes hold your bike wheels round and strong. Bumps, potholes, and vibrations loosen them over time. Tightening loose spokes is simple for beginners. You just need care to avoid over-tensioning, which warps rims. This guide covers spotting problems, tools, steps, checks, and prevention. Follow along, and you’ll spin smoother wheels soon.
Spot the Signs Your Spokes Need Attention
Loose spokes show clear warnings. You hear a thump-thump from the wheel on smooth roads. Or the bike feels unstable in turns. These clues mean tension dropped somewhere.
Spin the wheel by hand after lifting the bike. Watch for side-to-side wobble. Check if it rubs the brake pads. Pluck spokes like guitar strings. Tight ones ping high and clear. Loose ones thud dull and low. These tests take seconds at home.
Trail rides shake spokes free fast. City potholes do the same. Even daily spins wear them down. Ignore the signs, and braking gets uneven. Tires wear odd. Worst case, the wheel fails mid-ride.
Check both wheels, front and back. Fix before long trips for safety. It’s normal wear. You can handle it yourself.
Quick At-Home Tests for Loose Spokes
Lift the bike by the seat. Spin each wheel free. Look close for shakes or brake rubs. A wobble over 2 millimeters means loose spots nearby.
Run your finger across the spokes. Tight ones ring sharp. Loose ones sound flat. Press each spoke sideways with a finger. Loose ones bend far. Tight ones resist.
Mark suspects with a small tape piece. No tools needed yet. Spend five minutes per wheel. You’ll spot issues easy.
What Happens If You Ride with Loose Spokes
Picture this: your wheel goes out of true. Handling turns sloppy. You fight to stay straight. Rim stress causes pinch flats often.
Rough roads bounce you hard. Speed drops because energy wastes on wobbles. Comfort vanishes with every bump. A collapse mid-hill spells trouble.
Early fixes save money. No shop bills or new wheels. Act now, ride worry-free.
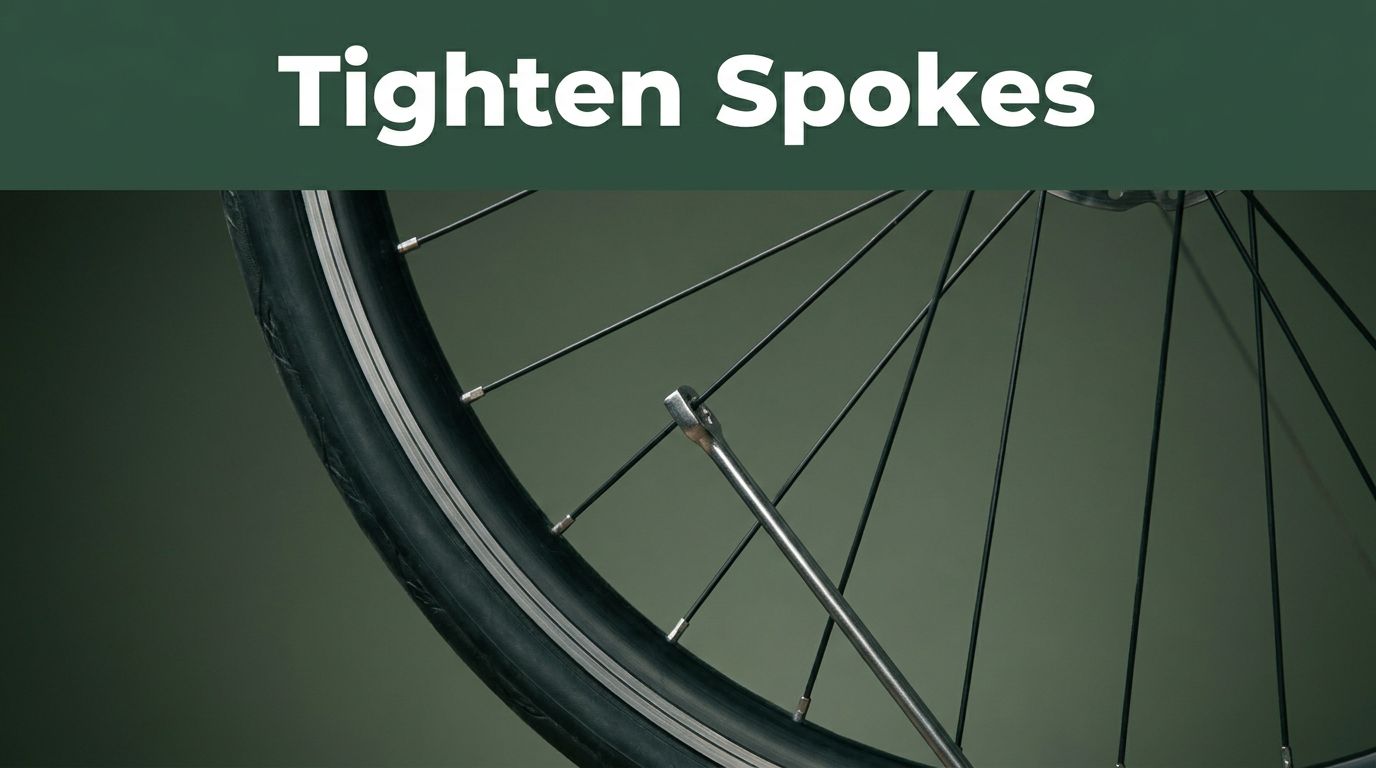
Tools You Need for Safe Spoke Tightening
Start with basics. A good spoke wrench fits your nipples right. Common sizes are 0.127 inch or 0.136 inch. Cheap ones slip and strip threads.
Get a truing stand if you can. Or use zip ties on the fork for wobble checks. Keep a rag handy for greasy fingers. Skip tension meters at first. Learn by feel.
Bike shops sell starter kits cheap. Label your wrench size for next time. These tools last seasons.
Picking the Right Spoke Wrench Size
Measure nipple flats with calipers. Or test fit at the shop. Road bikes often take 0.127 inch. Mountain bikes use 0.136 inch.
Pliers ruin nipples quick. They round edges bad. Park Tool makes tough wrenches. They grip sure without damage.
Match size perfect. Turns go smooth then.
Step-by-Step: Tightening Loose Spokes the Safe Way
Work on the rear wheel off the bike for best access. On-bike works too if you’re careful. Aim for even tension across all spokes. Never crank one hard alone.
Go slow with quarter turns. Use a star pattern to keep the wheel centered. Check often. This method stays safe.
Prep Your Wheel and Mark Loose Spots
Deflate the tire. Pull it and tube off if needed. Or squeeze through the rim channel.
Spin the wheel. Mark wobbly or dull spokes with tape. Start at the valve stem. It gives a fixed point.
Clean nipples first. Dirt hides true looseness.
Tighten in Small Increments Using the Star Pattern
Grab your wrench. Turn clockwise a quarter turn on a marked spoke. Skip to the opposite side next.
Then hit halfway points around the wheel. Like a star or cross. Do two or three full rounds.
This spreads force even. The wheel stays true. No pulls to one side.
Recheck and True the Wheel as You Go
Spin after each round. Note high or low rim spots.
Loosen nearby spokes a bit on high sides. Tighten lows slight. Zip-tie on the fork points tiny wobbles.
Brake rub stops. Spin smooth means progress.
How to Avoid Over-Tensioning and Check Tension Right
Feel guides you best. Pluck spokes for even high pings. Squeeze pairs together. They flex little but hold firm.
Too tight? They ring shrill. The wheel bows in. Nipples may spin free.
Back off with quarter turns counterclockwise. Use the star pattern again. Compare sounds wheel-wide.
Rookies rush one spoke. That pulls the rim bad. Patience wins.
Listen and Feel for Perfect Tension
Good tension pings uniform. Squeeze test shows slight give. No snap or rattle.
Uneven sounds? Loosen the shrill side first. Spin true, and pluck even. Done.
What to Do If You Over-Tighten by Accident
Stay calm. Loosen in pattern opposite the warp. Quarter turns fix most.
Re-true slow. If the rim bends true, head to a shop. Pros handle twists.
You’ll learn fast from slips.
Keep Your Spokes Tight for the Long Haul
Check monthly. Or after rough rides. A quick pluck keeps you ahead.
Ride seated more. It spreads weight even. Skip curb slams.
Build wheels later for skills. Pros tune yearly. Your tweaks add years to life.
Riding Habits That Save Your Spokes
Pump tires right. Low pressure hits rims hard.
Clean wheels often. Grit grinds nipples. Store upright, stable.
Pluck post-ride. Five seconds spots drifts early.
Spot loose spokes with simple tests. Grab the right wrench and tools. Tighten slow in a star pattern. Check by ear, eye, and feel. Maintain with habits.
Try it on your bike today. Safer rides wait. Share your first fix in comments. Subscribe for more tips.
Wobble-free adventures roll on.
(Word count: 1,428)