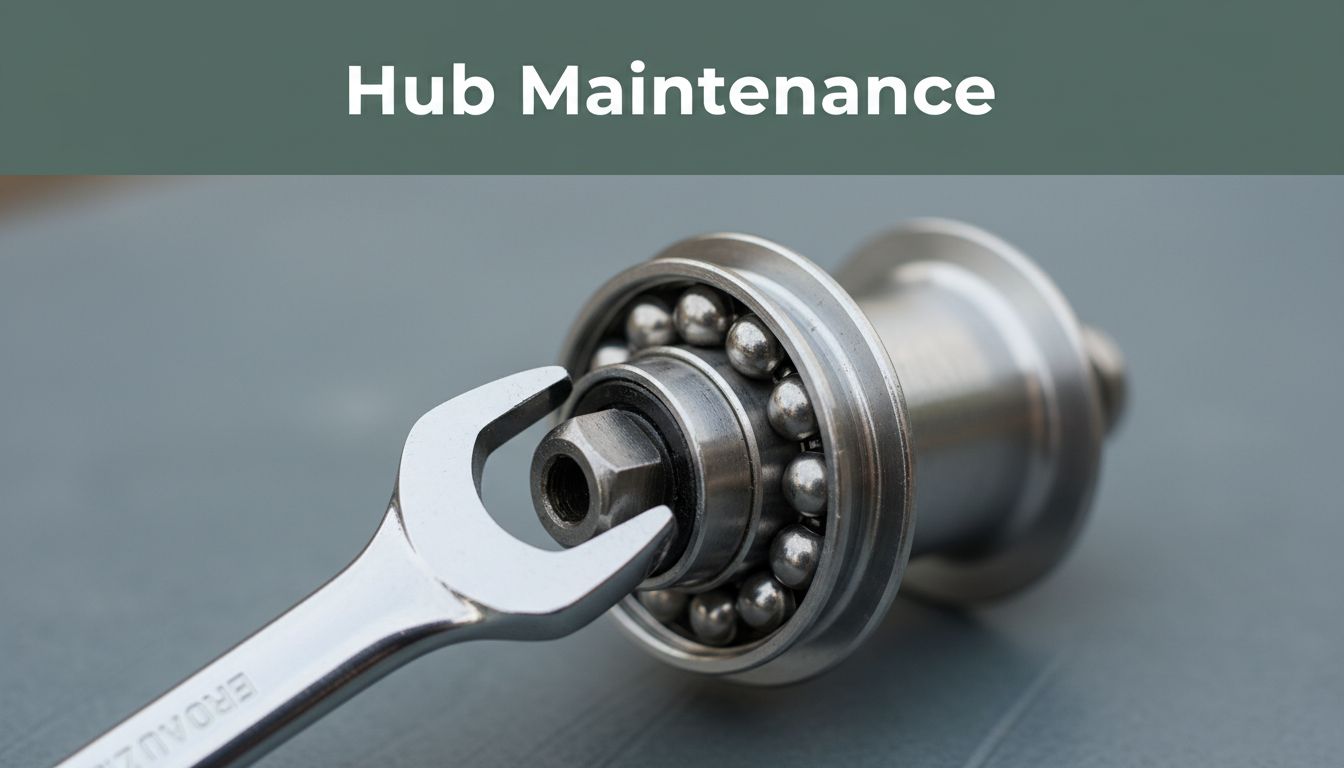
Picture this. You’re cruising down a sunny trail on your bike. Suddenly, a grinding noise starts from the wheel. That smooth spin turns choppy fast. Bad cup and cone hub bearings often cause it.
These hubs use loose steel balls that sit between an adjustable cone and a pressed-in cup. They differ from sealed cartridge hubs because you can tweak them. Common signs include unusual noise, side-to-side wobble, or stiff spinning. You might feel drag when pedaling too.
Fixing them yourself brings big wins. Rides stay safe. Hubs last longer. Plus, you save hundreds over new wheels. This guide walks you through inspecting and regreasing cup and cone hub bearings. You’ll need basic tools. Follow the steps, and your wheels roll quiet again.
Stock Up on These Tools and Supplies First
Prep saves headaches later. Start with the right gear. Most jobs need under $50 if you shop smart.
You must have two cone wrenches that match your hub. Common sizes include 13-15mm or 15-17mm. Check your bike specs first. These thin wrenches hug the cones tight. They prevent rounding off edges that other tools cause.
Grab an adjustable wrench or a 15mm one for locknuts. Pick quality bike grease too. Waterproof types like marine-grade hold up best in wet rides. Add citrus degreaser, lint-free rags, and gloves. Grease gets messy quick.
Optional extras help. A wheel truing stand or bike repair stand keeps things steady. Work on a stable surface always. Wear eye protection too. Degreaser sprays strong.
Local bike shops stock these basics. Online deals work fine for budgets. With tools ready, disassembly goes smooth. No surprises mid-job.
Disassemble the Hub Without a Scratch
Take your time here. Wrong moves damage parts. Front hubs prove easier than rears. Rear ones have extra bits like cassettes.
Pull the Wheel Off Your Bike Safely
Secure the bike first. Use a stand if you have one. Or flip the bike upside down with handlebars padded.
Front wheels come off quick. Pull the skewer or loosen nuts. Rear needs more care. Shift to the smallest cog. Release brakes if they grab the rim. Inspect the tire now. Look for flats or cuts while it’s off.
Loosen Locknuts and Unscrew the Cones
Spot left and right sides. Left cones often have reverse threads. Turn counterclockwise to tighten them.
Hold the cone wrench steady on the cone. Use the second wrench to turn the locknut opposite. Loosen both fully. Remove any spacers between cones. Feel for stiffness as you go. It hints at the problem inside.
Extract Bearings and Axle Carefully
Tip the hub over a rag. Bearings drop out easy. Expect 10-12 small balls per side.
Count them quick. Note if some stick inside. Rear hubs add freehub parts. Slide the axle free last. Set parts aside safe. Wrong tools strip threads fast. Cone wrenches keep it clean.
Spot Wear Early: Inspect Bearings, Cones, and Cups
Dirt hides issues at first. Clean parts help you see true. Check each one by feel and eye.
Replace if wear shows. Bad parts lead to unsafe spins. Match sizes when buying new. Balls run 3/16 inch usually. Cones and cups cost little.
Balance matters. Swap all bearings if one fails. Do the same for cones.
Check Bearings for Pits, Flats, or Rust
Roll each ball on your finger. Smooth ones glide free. Rough spots, flats, brass color, dimples, or rust mean replace.
Spin them in the cone next. Gritty sounds spell trouble. Clean first if grime builds up. Chrome steel holds strong otherwise.
Examine Cones and Cups for Grooves or Gauges
Look close for shiny tracks or scratches. Feel with your nail. Brinelling shows as small dents from impacts.
Cups press in hard. Minor grooves polish out light. Deep ones need pro work. Cones swap easy.
Test the Axle for Straightness and Threads
Roll the axle on flat glass. Wobbles point to bends. Replace it then.
Check threads too. Clean ones lack scars or cross-threading. A bent axle ruins adjustments fast.
Clean Thoroughly Then Pack with Fresh Grease
Grime kills bearings quick. Clean deep for like-new action. Dry fully before grease. Water mixes bad.
Deep Clean Every Part to Like-New Condition
Spray degreaser on everything. Scrub cones and cups gentle with a wire brush. Soak bearings separate in a jar.
Rinse well. Blow dry with compressed air or pat with rags. Check again now. Clean reveals hidden wear.
Apply the Perfect Amount of Grease
Dollop grease thick in each hub race. Roll one-third of the balls in it. Pile the rest on top.
Smear light grease on cone threads. Skip cheap car stuff. Bike grease fights water better.
Reinstall Parts and Dial in Cone Adjustment
Slide the axle through the hub. Drop bearings in both sides. Finger tighten each cone. Spin by hand until slight drag.
Back off a quarter turn for preload. Snug the locknut firm. No over-tighten. Test spin. It runs free with no play.
Reinstall the Wheel and Hit the Road for a Test
Pop the wheel back on. Torque axle nuts or skewers right. Bike manuals list specs, like 30Nm for rears.
Spin the wheel fast. Listen for quiet hums. Check trueness too. Head out for a short ride. Feel and hear changes.
Service hubs every 1000-3000 miles. Or do it yearly. Common slips include over-tight cones that bind. Loose ones rattle bad.
Fronts match rears mostly. Sealed hubs stay shut though. You can’t service those easy.
Share your fixes in comments. What trips you up most?
Inspecting and regreasing cup and cone hub bearings pays off big. Your rides turn safe and smooth again. No more grinds or wobbles.
Plan checks seasonal. It saves cash and boosts hub life. Your bike spins quiet for miles now. Grab tools and get started today.