Picture this. You hit a pothole on your last ride. Gears start skipping mid-climb. The chain rubs and whines. Frustration builds fast.
That’s a bent derailleur hanger at work. This small L-shaped metal piece mounts your rear derailleur to the frame. A bend throws off alignment. Shifts fail. Noise grows. Damage spreads.
You can fix it at home. Grab a basic alignment tool. Spend under 30 minutes. Save 50 to 100 bucks over shop costs. We’ll cover spotting signs, tools needed, step-by-step straightening, and testing tips. Beginners, you got this.
Spot the Signs Your Derailleur Hanger Needs Fixing
Gears skip under load. That’s a classic clue. Your chain hesitates or rubs the cassette. Shifts feel sloppy in certain cogs. These issues pop up fast after a bump or crash.
Cables stretch over time. But hanger bends happen suddenly from impact. So, think back to your last spill. A quick check from behind confirms it. Sight down the bike. Does the hanger look crooked against the frame?
Fix it early. Worn cassettes cost extra. Damaged derailleurs hurt more. Unsafe shifts lead to crashes. Act now. Save cash later.
Top Symptoms That Scream ‘Bent Hanger’
Noisy chain on pedaling tops the list. Misalignment pulls the derailleur off track. Gears fight like mismatched puzzle pieces.
Hesitation between shifts follows close. The chain struggles to settle. It rubs the next cog instead of clicking in smooth.
Derailleur looks crooked from behind. That’s visual proof. The cage angles wrong against the cassette.
Rubbing noises persist even after tweaks. Chain scrapes frame or spokes. Pedaling feels off.
You can’t reach the largest or smallest cog. The derailleur hits limits too soon. Or it overshoots.
Why Ignoring It Leads to Costly Repairs
Chain derails often first. Then the derailleur cage bends. Cassette teeth wear uneven.
Frame damage lurks in bad cases. Cracks form near the dropout. Repairs skyrocket.
Think car alignment. A small toe-out grows into tire chewers. Fix the hanger now for pennies. Wait, and pay hundreds.
Tools You Need for a Shop-Free Straighten Job
Keep it simple. No shop trip required. Start with a derailleur hanger alignment tool. Budget plastic or metal gauges cost under 30 dollars online or at bike shops.
This tool fits the dropout. Pointers show gaps to frame marks. Misalignment glows obvious. No guessing.
Grab basics too. An adjustable wrench or hex keys. A repair stand or way to flip the bike. Gloves protect your hands.
Optionally, add a torque wrench. It ensures proper tightness. Total setup stays cheap and easy.
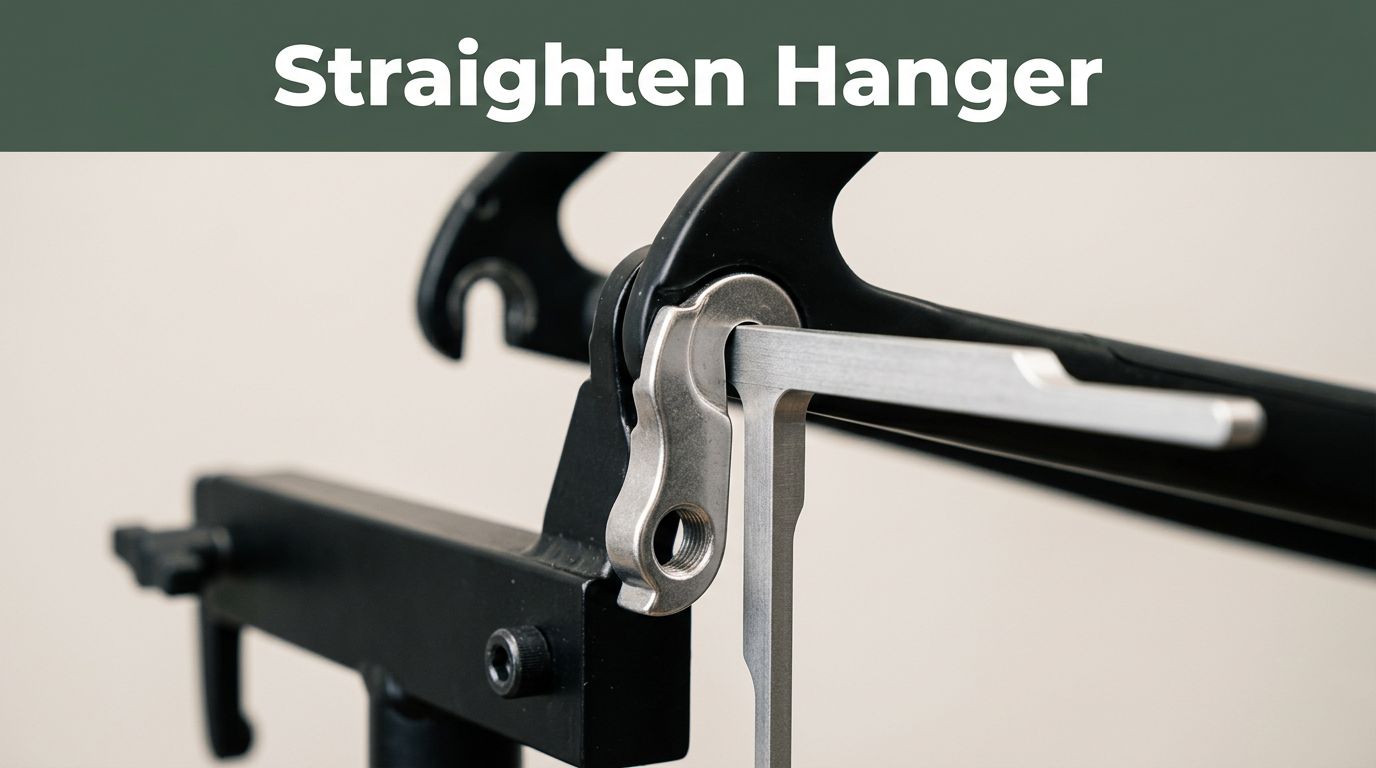
Breakdown of the Key Alignment Tool
The derailleur hanger alignment tool clamps or bolts on. It grabs the rear dropout and hanger flats. Arms or pointers aim at frame slots or holes.
Gaps reveal the bend. One millimeter off means trouble. It shows direction too. Inward, outward, forward, back.
Most fit road and mountain bikes. Park Tool makes solid budget ones. Precision beats eyeballing every time. Plus, you reuse it.
Everyday Tools to Grab from Your Kit
- 5mm Allen wrench: Loosens the axle.
- Large wrench (24-32mm): Grips hanger flats for bending.
- Clean rag: Wipes dirt from dropouts.
Nice extras include a stand and chain lube. Gloves stay must-haves. Buy basics for under 50 dollars total.
Master the Straightening Process Step by Step
Work gently. Check often. Overbending creates new problems. Secure the bike first. No wobbles allowed.
Assume a standard road or MTB setup. Derailleur stays attached unless noted. You got this. Follow along.
- Shift to the smallest cog. Pedal lightly. Chain stays slack.
- Hang the bike by the seat or top tube. Or use a stand. Rear wheel off the ground.
Set Up Your Bike for Safe Work
Shift to smallest cog first. That relaxes the chain. Secure the bike upside down. Use a stand if you have one. Otherwise, hang it stable by the seat and top tube.
Remove the rear wheel only if your tool needs it. Many don’t. Clean the dropout area. Dirt hides cracks.
Inspect the hanger close. Cracks mean replace it. Snug all bolts, but don’t overtighten. Torque the axle to 10-12 Nm later.
Attach the Alignment Tool and Check the Bend
Slide the tool into the dropout. Align it with hanger flats. Tighten per instructions.
Watch the pointers. Gaps to frame marks show the issue. Say 1mm left means bend that way. Note direction. Snap a before photo.
Crashes often bend hangers inward or back. Common on drops or rocks.
Bend the Hanger Back into True
Grip the wrench on flats. Apply steady pressure opposite the bend. Or tap light with a mallet.
Recheck the tool after each tweak. Aim for quarter-turn moves. Pointers must align perfect.
Support the derailleur cage. It dangles heavy. This takes 5 to 10 minutes max.
Reassemble and Initial Spin Test
Bolt the wheel back if removed. Torque the axle snug, around 10-12 Nm.
Spin the cranks backward. Shift through all gears slow. Watch for rubs or skips. Listen close.
Wipe and lube the chain. Gears should whisper now.
Test Your Fix and Bulletproof It Long-Term
Hit a short spin first. Confirm shifts crisp. No noise under load.
Pitfalls happen. Readjust if off a hair. Cracked hangers need swaps.
Prevention beats fixes. Check after every crash.
Road Tests to Confirm Perfect Shifts
Pedal a block in all gears. Light load first. No skips or rubs.
Climb a hill next. Gears hold firm. Chain stays put.
Full ride seals it. Monitor noise over 10 miles. Use a derailleur gauge for double-check if unsure.
Smart Habits to Keep Your Hanger Straight
Inspect after rides or falls. Look from behind quick.
Mountain bikers, add guards. Store bikes right side up.
Many hangers are cheap replaceables. Stock a spare for 5 to 20 dollars. Match your model.
Join online forums. Get bike-specific tips there.
A bent derailleur hanger derails your rides fast. But a simple alignment tool straightens it easy. You save time and cash with basic steps and care.
Anyone handles this at home. Test thorough. Ride confident.
Grab your tools. Fix that hanger today. Share your before-and-after pics in the comments. What bike hack you tackling next? Smooth miles await.